Ah the perennial go-to for lunch, for the working crowd in CBD. It serves up many hearty meals, from morning breakfasts to satisfying lunches, even managing a decent cuppa. After all that, it transforms into a cocktail bar come nighttime. Free the Robot manages a pleasant, cozy ambience should you arrive before the lunch hour rush.
Said decent cuppa.
Salmon bowl with onsen egg, avocado and acar, it is wholesome, healthy and filling. The salmon is smoked, so beware if you’re not a smoked salmon fan. Otherwise this is a perfectly acceptable, even delicious, lunchtime meal.
Chicken and avocado sandwich. Tender slices of chicken, sandwiched with cheese and creamy slabs of avocado and slathered with pesto sauce. Griddled to perfection. Great combination of flavours.
I regret not taking a proper photo of their burgers, but this might be the only way to showcase the juiciness of their patties. Very good execution, sufficient sauce and topped with a fried egg. It is difficult to find decent burgers in Singapore, and thankfully this ticks the right boxes.
My absolute favourite however, is the crab pasta. Generous chunks of crab cooked in a fragrant tomato base sauce, topped with pine nuts and chives. I could eat this every week (every day would be a stretch for anyone!). It is also a tad spicy, which ties all the flavours together in a neat little bow. Lovely.
This is comfort eating; foods that we are all familiar with, with a dash of inspiration. Affordable eats to soothe the stress of the work day.
Free the Robot
118 Telok Ayer Street Singapore 068587 (Telok Ayer MRT)
Opening Hours: 8.30am – 4.30pm (Tues-Sat, closed Mon and Sun)
Penang is surely the holy grail when it comes to our favourite hawker foods. The best assam laksa, the best char kway teow, the best oh zhien (fried oyster omelette), the best prawn mee, and the litany goes on. But us poor souls elsewhere have to scrounge and scrape (or at the very least, go on numerous foodie trips around town) to get at something close to the standards that Penang generously offers in its bountiful hawker stalls.
I was very pleased when I finally came across Restoran Shangri-la, a coffee shop located in Plaza Batai that I would never have deigned to visit if not for friends.
Best Char Kway Teow in KL! It has the elusive wok hei, without the use of dark soy sauce that many char kway teow places abuse, and enough oil and spice to make it sinfully delicious. It makes use of blood cockles as well, as the Penang version does. Top it off with a perfectly deep fried egg and there you have it, a winning plate of delectable, aromatic, mouth-watering goodness.
The pork noodles is famous as well. I usually go for the kway teow soup noodles, topped with an egg. Noodle soup it may be but healthy it is not! How could it be when it tastes so rich and smooth, with a couple of ubiquitous lardons floating on the surface. The pork meat is soft and the thin kway teow has a silk-like mouthfeel.
A very hearty bowl indeed.
Might I say, these dishes are comparable to that of Penang’s?
Address: 7, Jalan Batai, Bukit Damansara, 50490 Kuala Lumpur, Wilayah Persekutuan Kuala Lumpur
After two long years my books are finally done and dusted. I’ve compiled two books, the first Myhumblefood book concentrates on Asian home cooking. The second book is a little more fun; along with some Western home cooking, I’ve also added a section on Food Art which is something I really enjoy. They’re both priced at RM 300 a set for people residing in Malaysia, or SGD 120 a set for those in Singapore.
Free delivery for those in Bangsar and Damansara Heights only.
Please PM me for details!
Special note: 50% of gross profit from the sale of the books will be donated to the National Kidney Foundation as well as the Great Heart Charity Foundation. Should you decide to also donate in addition to buying the book(s), 100% of your donation will go directly to these causes.
Thank you all very much for your love and support!
I’ve been itching to have a go at making this pie for a while now! What’s not to love about creamy mashed potatoes and a hearty thick lamb mince ragu all in a single bowl? It’s a pretty balanced meal is it not? Carbs, protein and vegetables? Let’s forget for a moment about the amount of cream and cheese that went into it and label it as the ultimate balanced meal.
Comfort food. Easy to put together. I will definitely make this again! The recipe calls for peas and corn as well but I made do without them since I’ve got a picky eater on my hands today!
Ingredients
Meat Layer
Minced lamb – around 700 grams
2 carrots, diced into smallish cubes
1/2 cup fresh corn kernels
1/2 cup fresh English peas (if you’re feeling lazy there’s always the frozen mixed vegetables option which has carrots, corn and peas all in one convenient bag. Use 1.5 cups of the mix then)
4 cloves garlic finely minced
1 cup minced onion
3 tsp chopped rosemary leaves
3 tsp thyme leaves
1 1/2 cups chicken broth
1 cup dry red wine
3 tbsps Tomato puree, have an additional 3 tbsps on hand if you prefer more of it in the ragu
2 tbsps Worcestershire sauce – other recipes call for 1 tsp, I found it insufficient and ended to my taste, so add to your taste
2 tbsps all purpose flour
pepper to taste
Potato Layer
700 grams peeled russet potatoes approx.
200 ml cream
30g salted butter
pepper to taste
1 tsp garlic powder (optional)
1 cup grated cheddar cheese
fresh thyme leaves
Cooking Instructions
Heat up butter in a large deep skillet on medium high heat
Add the chopped onions first, and cook until translucent and starting to caramelise.
Add the garlic and fry for about half a minute or so until that’s soft
At this point if the mixture is getting a tad too dry, add a little more butter. After which we can now put the lamb mince into the pan to brown. Break up the meat into small pieces (the smaller, the smoother the ragu will be, but that’s only if you like it that way)
Mix in the vegetables, we’re only adding them now as we don’t want to overcook them
Sprinkle the thyme and rosemary over the mixture and give it a good stir.
Pour in the red wine, chicken broth, Worcestershire sauce and tomato puree and flour.
Bring the sauce to a boil and lower the heat to simmer for a couple of minutes. The flour should thicken the sauce in the process.
Turn the heat off and cover with a lid.
As for the potatoes, place them in a large pot and cover with cold water
Add salt to the water
Bring to a boil. Once they are pierced easily with a fork, drain them. Check in about 10 minutes, if the potatoes are still resistant to the fork the leave for a bit longer. However, take care that you don’t overcook them. Don’t want mushy potatoes!
Press the potatoes through a ricer (or mash them by hand) and put aside.
Meanwhile, melt the butter in a saucepan and add the cream. Bring this to a gentle simmer before adding the potatoes to the cream and mixing it all up. Season with salt and pepper.
(Additional step:- you can put the mashed potatoes through a sieve to get rid of all the lumps for that smooth mash)
Ladle the ragu into your prettiest deep dish (one that is oven-compatible). Sprinkle a layer of cheese over the ragu. Spread the mashed potatoes evenly over the ragu like so. After which you’re done. You can use a fork to create patterns on the mash which will turn out a little crispy after some time in the oven. My ideal meat ragu to potato ratio is 3:1.
However, you can add more if you like your mash. Here, I decorated the top by squeezing the potatoes through a decorative nozzle.
Sprinkle some cheese over the top of the mash layer, and arrange some thyme leaves strategically into the top layer as a sort of garnish and for the fragrance.
Bake at 205 Celsius for around 20-30 minutes Added some chopped chives before serving, just because I like chives.
I’ve previously mentioned in an earlier post on how to make clear chicken soup. This recipe is similar except that there’s a lot more garlic and scallions in it. It’s a healthy dish and an easy one to make too. All you need is a little time to draw out the chicken essence into the soup.
Ingredients:
1 whole chicken (3 – 4 pounds) – some say that cornish hen works best but as I couldn’t find one, I used an antibiotic free adult chicken
10 – 12 garlic cloves
1 small piece ginger, sliced
1 medium onion, cut into halves
3 scallion stalks – white parts
1/2 teaspoon whole black peppercorns (optional)
Codonopsis roots (very much optional!!! I only added this because I had it in hand but the traditional Korean chicken soup does not include any herbs – this excludes the famous Korean Ginseng Chicken soup which has young ginseng and red dates in it)
3 Red dates, pitted (again, very much optional)
Extra chicken bones (optional)
10 cups of water
3 scallions – green parts, finely chopped to garnish
salt and pepper to taste
Cooking Instruction:
The chicken has to be at room temperature before working with it. If you’ve kept it in the fridge, allow it to sit, covered of course, for half an hour at room temperature.
Cut off the wing tips and the tail end. If the chicken came with its head and feet intact, cut those off too. I’m unfortunately squeamish in this area.
Remove any excess skin, otherwise the soup will end up overly loaded with oil
Remove giblets from the chicken cavity.
Wash the chicken under running water and pat dry.
On high fire, prepare a pot of boiling water (pot has to be large enough to fit all the ingredients with room to spare so that the water doesn’t come splashing out as it boils)
Lower the chicken (and extra bones if you have any) into the boiling water and boil for 3-5 minutes before draining the water from the pot. This step helps to ensure further removal of impurities (blood, gunk, etc)
Add the garlic, onion, white parts of the scallions, ginger and peppercorns (and only if you have it, the roots and the dates) to the pot. Lastly add the water. The water level should be at least 2-3 inches above the chicken as it will reduce during the cooking process.
Bring everything to a boil over high heat and then reduce the heat to medium-low to simmer, covered for about 40 -50 minutes. During the cooking, skim off any foam that starts floating about on top. Otherwise you’ll have yourself some really murky looking soup!
Remove the chicken from the broth and place into serving bowl. If you’ve used extra bones, continue simmering for another 30 minutes. If I were just making regular chicken soup, I’d be simmering the lot for 1.5-2 hours. Doing that would compromise the chicken meat but it makes for extremely flavourful soup. As this recipe goes, the chicken should not be overcooked, yet we need the soup to be flavourful. This is where the extra bones come in handy – you can boil those without caring if they become tasteless in the end!
Add salt to the soup to taste.
To serve, you can serve the chicken and the soup in a large decorative soup bowl, garnished with the green scallions.
OR you can ladle some rice into a bowl, top with bite sized chicken bits and pour the soup in, topping everything off with the scallions.
I chose to eat mine with plain rice porridge and some kimchi. Seaweed would have been amazing too!
This is one super easy and delicious don! (don = rice bowl dish in Japanese). All you need to actually cook is the rice. The rest is all about slicing up the sashimi and avocado and assembling the rice bowl. Since the current trend now is all about clean eats, clean foods and healthy eating, I suppose this makes the cut (if you ignore the ubiquitous mayonnaise blobs popping up among the luscious chunks of creamy avocado and fresh maguro). Ingredients (for 1 person)
100 grams sashimi grade maguro tuna
1/2 ripe avocado, pitted and skinned
Mayonnaise – amount at your discretion, I used Japanese mayonnaise
Cooked short-grain white rice
2-3 tsp soy sauce depending how seasoned you like your tuna
Optional (for garnish) – chopped chives, seaweed flakes and thinly sliced leeks (only the white parts). I would highly recommend you add these as they add texture, lots of flavour and freshness to the dish
Optional – furikake (a type of Japanese rice topping/seasoning)
Method
Slice up the maguro sashimi into thick chunks, I cut mine into 3/4 inch cubes but do it however you like.
Season the maguro with soy sauce and set aside.
Cut up the avocado into cubes/chunks roughly the same size as the maguro.
Place the rice in a bowl (if you’ve opted for the furikake, mix it into the rice before arranging the rice in the bowl) and pile the maguro and avocado on top.
Squeeze mayonnaise over the dish in zig-zag lashings or you can add them in blobs like I did.
Add the ikura and garnish with chives, seaweed flakes and sliced leeks.
Serve
I enjoyed it so much I had it again for the next meal… only in the sloppiest, most disgusting way one eats when alone:- Still tasted amazing nonetheless!
Here is the second half of the lobster (first half of which went to making the lobster pasta) and the easier recipe of the two. The original version called for fresh river prawns/big head prawns but since I had the lobster, I figured I could use that instead and add in some large prawns as a bonus. Since there is no recipe that I could refer to online I tried to recreate the taste the best I could remember. Turns out I’m actually quite satisfied with the results! Now without further ado, the recipe:-
Ingredients (4 pax)
1/2 lobster
6 large prawns (in my first attempt I used 3, but the attempt with 6 prawns tasted better)
1 inch ginger, sliced
1 tbsp minced garlic
1 tbsp minced onion
1/2 cup Shaoxing wine (maybe a dash more if you like)
5 cups chicken stock
Chinese lettuce (I used a quarter of a head), cut into bite sized pieces
1 tsp sesame oil
150g Glass noodles
Spring onions chopped into large three inch sections.
Coriander for garnish
Finely chopped spring onions for garnish
salt
The array of ingredientsGlass noodlesLarge lobster.
So we shall start with the prawns. De-shell all the prawns and set the shells/heads aside. Do NOT throw them away! Then devein them and cut each prawn into three sections.Size of the prawn heads and my hand, just for comparison. Lots of flavour in those prawn heads!
Cut the lobster into half. If the lobster is as spiny as this one, do use a towel and be very careful when handling it. A pair of strong kitchen scissors would be a great help here.
More pictures of the lobster… as you can probably tell, I’ve added pictures from a second lobster noodle attempt into the mix. The second lobster looked way fresher and more succulent with its firmer white flesh and golden globules.
When you’ve managed to cut the lobster into half lengthwise, chop the tail into three parts and dig out some of the flesh from the head (I forgot to do that here) and set that aside with the prawns. Leave the orange/golden stuff behind.
Heat up some oil in a large pot and fry the ginger, garlic and onions until the onions are translucent and the aroma of the ginger comes out. It helps to crush the ginger before or during this step.Add the prawn shells and fry until half cooked (almost that coral colour they become when they’re fully cooked) before adding the lobster head to the pot.Continue frying for a minute or so, adding a little oil if it gets too dry. Then add the shaoxing wine to soak up all that flavour that’s coming from the prawn shells and lobster head. I actually would have liked to add another half cup of shaoxing wine but I was worried my family may not like the taste so I stuck with half a cup, but go ahead and use that extra half a cup if you like.
Add the stock and simmer for around 15 minutes before turning off the heat. Cover the pot with its respective lid and leave it for perhaps an hour.
Then, remove the prawn shells from the stock (if you had a strainer bag in the first place, use it to hold the prawn shells because it can be a chore to pick them out from the soup).
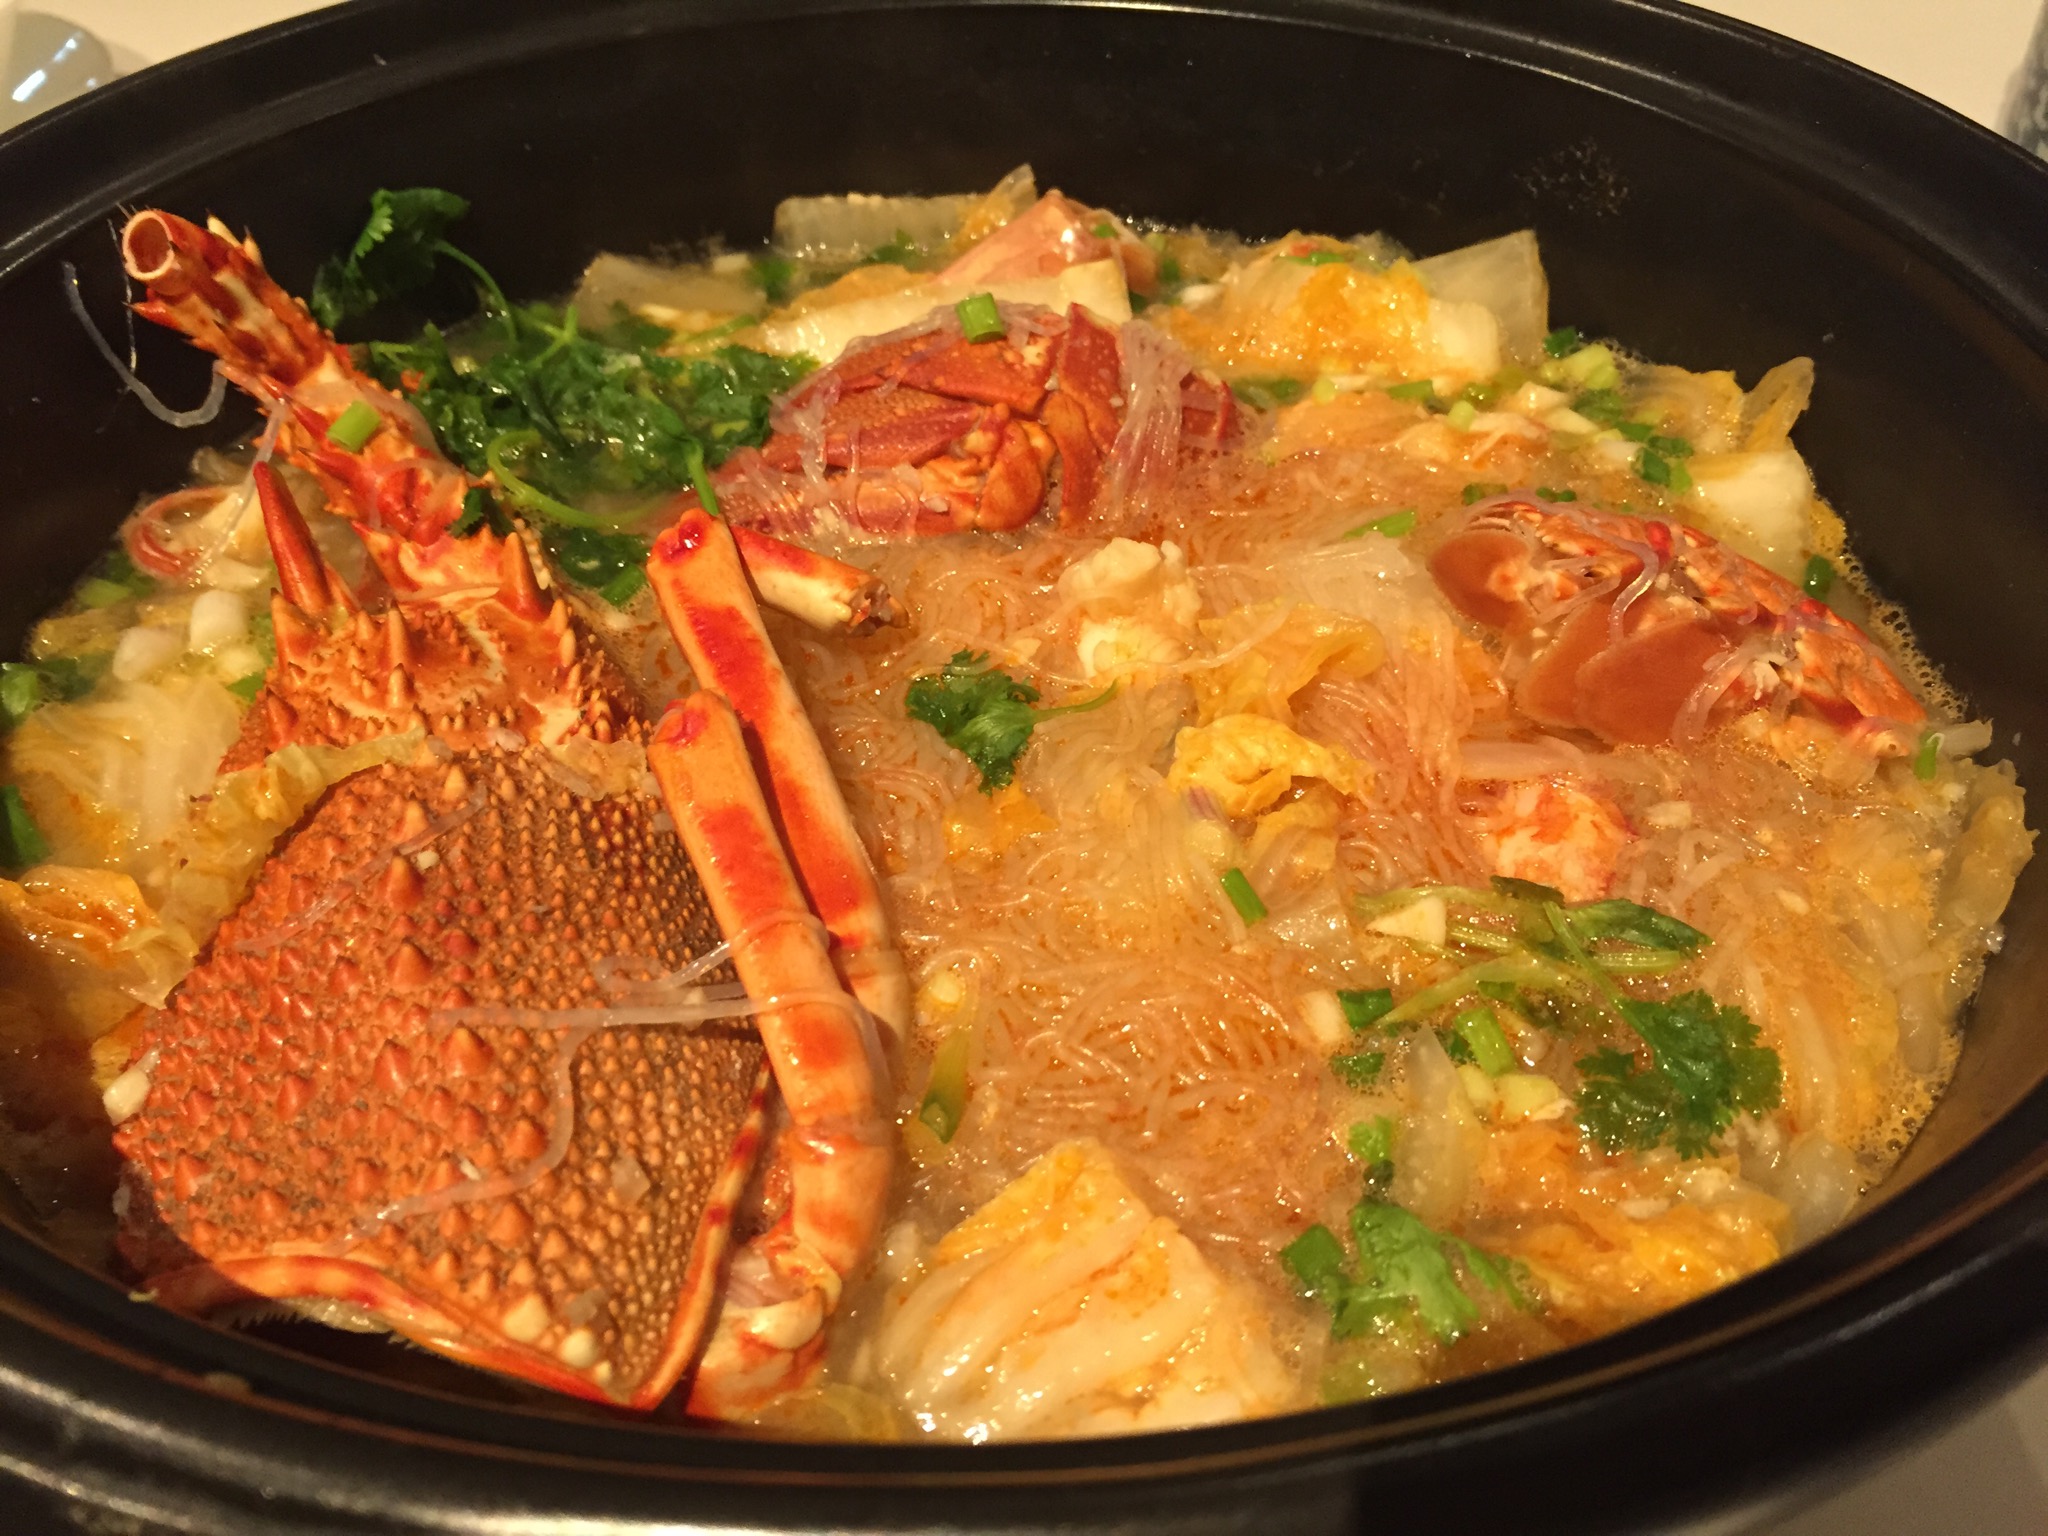
Toss in the lobster and prawn meat that was set aside earlier, along with the spring onion sections, lettuce and glass noodles. The reason why we cook the shells and the meat separately is so that we can extract the most flavour out of the seafood from the shells without overcooking the meat, which is only added at the end. If you were to cook the meat right at the start, you’re going to end up with some very hard, overcooked and dry chunks of prawn/lobster which is such a waste of good seafood.
Place the lid back on and bring the soup to a boil.
Add the sesame oil at the end and season with salt. Top with chopped spring onions and coriander. Easy peasy!
Recently I’ve been having this urge to cook lobster. Lobster… anything! I initially wanted to make a lobster roll, then I went to Signor Sassi in London and had a variety of lobster dishes. I eventually settled for making lobster spaghetti in tomato sauce and a lobster version of the Sang Har Tong Fun (big head prawn with glass noodles in wine soup). I’ve done a little research online on how to make this dish. A lot of chefs tend to boil the lobsters and then remove the meat to cook in the tomato sauce. The carcass of the lobster usually goes into a shellfish stock or a bisque later on. I do it a little differently, and I firmly believe that the lobster flavours are able to come out in all its glory this way. Obviously it would involve cooking the shell and head in the sauce ;D.Ingredients (for 2-3 pax)
Half a lobster (this is of a larger lobster)
10g salted butter
2-3 thin slices of ginger about an inch in diameter and about 2-3 mm in width
1/2 cup dry white wine
1 tbsp chopped fresh basil
1 tbsp chopped fresh parsley
2 tbsp chopped onion or shallots
1 tbsp chopped garlic
1/2 cup chicken stock (best if you have shellfish stock but chicken is fine too)
1/2 cup tomato puree
1/2 cup diced tomatoes preferably with herbs and garlic in them
2-3 pinches of chilli flakes
1 tsp sugar and another 1tsp in case the pasta needs a little more sweetness
200g pasta (or around 1/3 of a 500g package of pasta) – spaghetti is slightly too thick so I used San Remo’s vermiccili pasta. Instant spaghetti by San Remo’s will do as well.
Dash of dried oregano
Salt, black pepper
Cooking Instructions
Prepare the lobster (prepare yourself I meant…. cutting that thing into half is no joke! It’s all spiny and painful! Coupled with a very tough shell, you may need a lot of strength to cut the head into two… or a very heavy object to help get that cleaver through). I suggest you use a towel to protect your hands from the lobster’s myriad spikes and a pair of strong kitchen scissors to cut through the tail end of the lobster.After a lot of effort… finally..See all that golden stuff?? That’s where the flavour’s at!Heat up some oil in the pan and fry the onions, ginger and garlic.
Add the lobster, brain side down, and let it fry for a minute (do not let the meat sear! It should be on medium fire), before adding the wine to the mix. I wanted to try to flambe the lobster, but the kitchen is so small and I was worried I might singe something so I just put the alcohol into the pan and let the alcohol cook off. This step is where you draw out the flavours in the lobster into the broth.
Add the stock. Cook the lobster for about a couple more minutes in the stock before removing from the mixture.
Add the diced tomato, tomato, chilli flakes, some salt, pepper and oregano to the lobster broth.
Remove the meat from the lobster shell. You can see that it isn’t cooked through and this is what we want as we will add the lobster meat back in to be cooked fully along with the pasta noodles. Otherwise we’ll have dry, overcooked chunks of lobster, which is a waste of such an expensive ingredient.
Place the lobster shell back into the tomato sauce mixture and simmer until the sauce is reduced and thickened like so. Then add the butter and mix in. I stuffed the sauce into the lobster shell to get the most of that lobster goodness!
At the same time, start cooking your pasta in boiling water with some salt. Cook it about 2 minutes less than the instructions stated in the packet because you’ll finish cooking the pasta in the sauce.
Get the chopped basil and parsley ready. Add the lobster chunks back into the tomato sauce probably a couple of minutes before adding the pasta so that it’s cooked just right by the end of the whole process.
Drain the pasta (but not too much as we need some of that pasta water… about 2-3 tbsps or so) and add it directly into the sauce. I forgot to mention, remove the lobster shell before you add the pasta in, otherwise it’s going to be a struggle to toss the pasta in the sauce. Place the shell in the serving dish, it will serve as an aesthetic component.
Toss the pasta over low-medium fire so that the sauce gets incorporated into the noodles. Add the basil and parsley and toss a little more. Check on the seasoning and add more salt/pepper/sugar as you wish.
Place the pasta on the serving dish, top off with the lobster chunks, more parsley and some cheese.
If you like your spaghetti with more sauce, just add more puree and white wine but make sure you season accordingly. You also don’t want the sauce to be too wet otherwise it won’t stick to the noodle very well.
Will most likely make it again as I have another lobster in the freezer! Happy to say my brother seemed to enjoy it. He ate three quarters of it by himself.
Here’s a video that I think quite closely reflects how I cooked it:
Bought some really fresh, plump salmon sashimi and some scallop as well. Thought I’d just quickly whip up some hoedeopbap (Korean sashimi salad) to go with some freshly cooked rice. Rice is one of my guilty pleasures and I try not to have carbs at night but I couldn’t resist… yet again T___T
Here’s the link to the initial post I did up on Hoedeopbap. I just changed some of the vegetables and type of fish according to the ingredients that I have on hand. The one thing that doesn’t change is the sauce. Also, I managed to get hold of Korean perilla leaves (kkaenip)! It was so difficult to find in Singapore, so I was shocked when I came across it by accident in a korean grocery store in Kuala Lumpur. I quickly snapped up 3 packs of it!
My prize: the korean perilla leaf in all its glory
And the rest is just arranging the salad so it looks pretty 😉
On a recent trip to Hokkaido, I finally got to try sukiyaki. It’s a pretty commonplace dish, one that I’ve never tried because most of the time sukiyaki tends to be a quintessential beef hotpot dish. I don’t eat beef so I could never have it. In Hokkaido however, I found a sukiyaki place that offers the pork option. After cooking the pork in the sauce and dipping it in raw egg, I fell immediately in love with sukiyaki.
Many cooking videos and recipes later I discovered that there are two main types of sukiyaki; kansai style sukiyaki and kanto style sukiyaki. Kansai style sukiyaki calls for the method of frying the meat in some rendered fat and sugar before adding the sauce and the rest of the ingredients to the pot. Kanto style is where the sauce, called warishita (割り下), is prepared beforehand and everything is thrown in. This is what I am more familiar with. Normal chinese hotpot sessions normally have large boiling tubs of soup with various vegetables, fishballs and meat thrown in. I guess sukiyaki is a little more special as it seems to be geared towards good cuts of meat. It is also sweet and savory making the cooked meat perfect with a bowl of white rice.
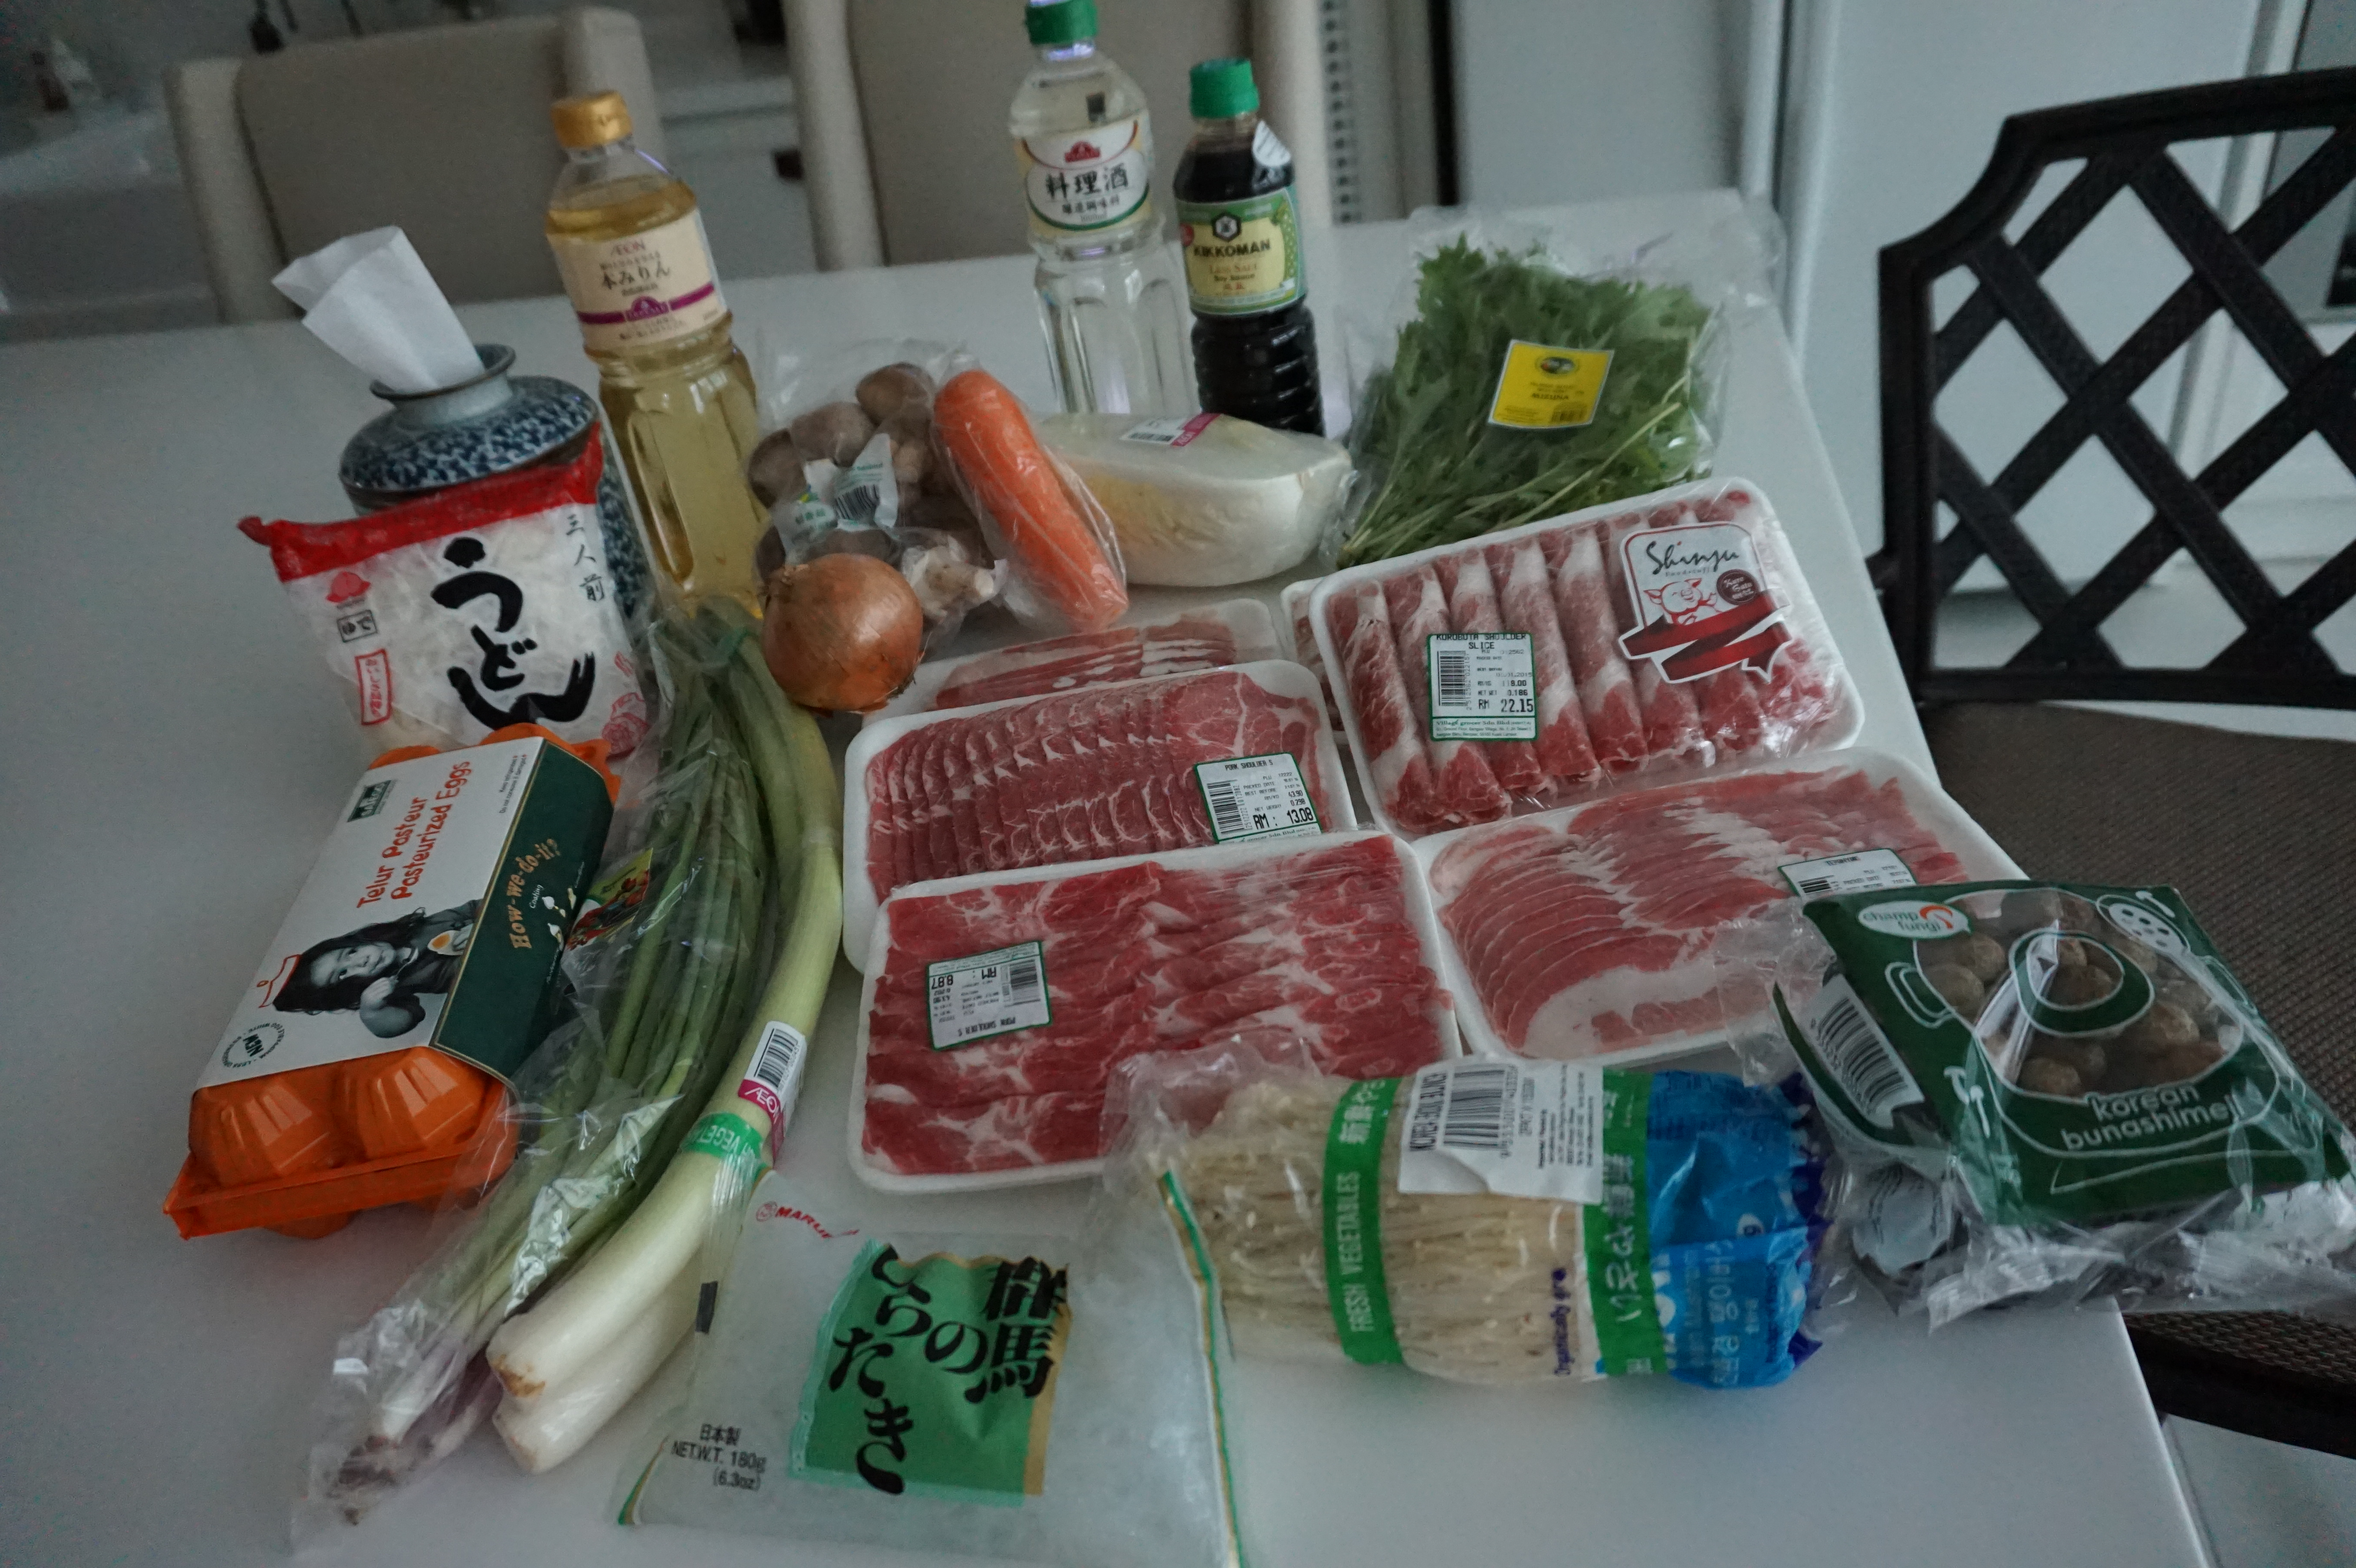
I was initially worried about the idea of using raw egg back here in Malaysia. Salmonella and all. Then I discovered that pasteurized eggs are safe for raw consumption as they eliminate risk of Salmonella and Avian flu virus. Make sure you do your research before buying and consuming raw eggs in any circumstance! I bought mine from safeegg at Aeon:-
3/4 cup sugar and 1-2 tbsps extra sugar in case you want it sweeter (*edit* I used less sugar and found it so much better, around 2/3 cup. I’d recommend 2/3 cup of sugar rather than 3/4 cup as it is less cloying and enhances the taste of the ingredients better)
1.5 cups light soy sauce (I got the low sodium Kikkoman soy sauce, which is why I still had to add a little salt afterwards; it wasn’t salty enough ;p)
2 tsp salt
4.5 cups water
Other ingredients
1.5 kg of sliced meat (I got some sliced pork belly, pork shoulder and even managed to get some kurobuta meat)
1 leek
4 stalks of spring onion
6 pasteurized eggs
1 carrot
1 large onion
1 pack firm tofu
1 pack enoji mushroom
10-12 fresh shiitake mushrooms
1 pack other mushrooms (whichever you like)
Shungiku leaves – I couldn’t find these so I used mizuna. You can use any other preferred leafy vegetables
1/2 chinese cabbage
Udon (I used 3 packets but since we also had rice we couldn’t finish all the udon. Cook as much as you think you need)
For sukiyaki it would be sufficient if you had a multi-purpose cooker placed in the center of the table so as to cook all the food as you eat. I do NOT think it is a good idea to throw in all the ingredients and cook it in the kitchen and brought over to the table. It pretty much defeats the purpose of sukiyaki and more often than not your ingredients will be overcooked and will lack the “freshly cooked” taste to it. I used a cast iron pot with sides high enough so that I can fit all the vegetables comfortably, as well as a hot plate.
Cooking Instructions
Wash all the vegetables and mushrooms.
Cut off the roots of the spring onions and cut the spring onions into 3 sections.
Cut off the roots of the enoki mushrooms and separate them
Cut off the stems of the shiitake mushrooms and create star shape patterns onto the cap of the mushrooms
It’s also a good idea to arrange the vegetables in large plates as you go along. Presentation is always important in Japanese cuisine!
Slice the carrot thickly
Slice onion
Cut the chinese cabbage into bite sized pieces
Pour a tablespoon of oil into a frying pan and fry/sear the surface of the tofu. What we are making here is yaki-dofu or grilled tofu. This is a good step-by-step on how to make it:http://japanese-kitchen.net/yaki-dofu-grilled-tofu/
Once you’re done searing the tofu, cut it into bite sized pieces
Tadahhh! All that effort of cleaning and cutting those vegetables! Not to mention searing tofu. I accidentally broke off some of the edges T___T
Prepare the udon according to instructions and set aside
Drain the shirataki and set aside
Next, combine all the wareshita ingredients in the pot and simmer to dissolve sugar.
Prepare all the meat and have it on standby with the vegetables.
Start the sukiyaki feast!
Place your pot on the hot plate and bring the sauce to a simmer. Cook the meat, dip into raw beaten egg and eat with fresh white rice. Throw the ingredients in according to your preference but I’d suggest putting in the leeks, onions and carrots first along with the meat as it lends more sweetness to the sauce. Not that it matters much, the sauce is already sweet enough, it’s just that these vegetables also take more time to cook. Enjoy!!


 H
H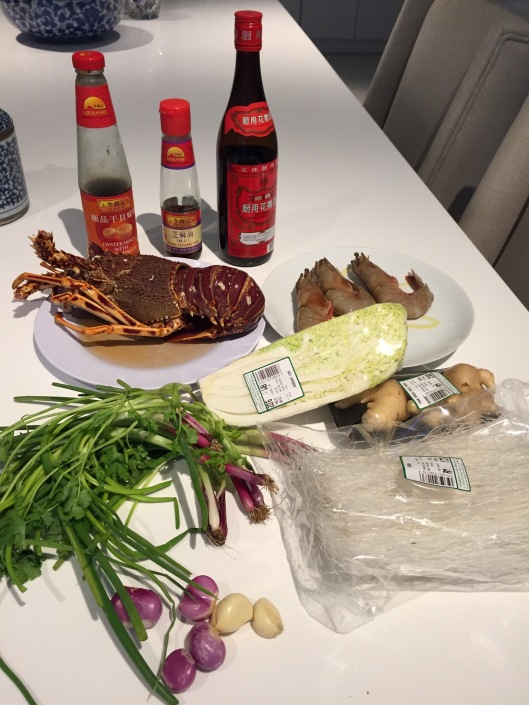 The array of ingredients


 When you’ve managed to cut the lobster into half lengthwise, chop the tail into three parts and dig out some of the flesh from the head (I forgot to do that here) and set that aside with the prawns. Leave the orange/golden stuff behind.
 Heat up some oil in a large pot and fry the ginger, garlic and onions until the onions are translucent and the aroma of the ginger comes out. It helps to crush the ginger before or during this step.


 Heat up some oil in the pan and fry the onions, ginger and garlic.