• About me

myhumblefood

~ Cooking in and dining out. Foodie escapades and kitchen trials

myhumblefood

Category Archives: Chicken

Myhumblefood cookbooks are finally out!!!

29 Friday Dec 2017

Posted by denisegan in Beef, Bento, Bread, Breakfast and Brunch, Cakes, Chicken, Chinese, Condiments, Confectionery, Cookbook, Cookies, Desserts, Dinner, Dips, Drinks, Eggs, Fish, Healthy, Home Cooking, Italian, Japanese, Korean, Lunch, Mains, Nonya, Noodles, One bowl meal, Pasta, Pork, Restaurant review, Rice, Salad, sandwich, Sauces, Seafood, sides, Snack/Light Meals, Soup, South East Asian, Starter, Stew, Uncategorized, Vegetables, Western, Wine

≈ Leave a comment

Tags

myhumblefood; myhumblefoodcookbook

After two long years my books are finally done and dusted. I’ve compiled two books, the first Myhumblefood book concentrates on Asian home cooking. The second book is a little more fun; along with some Western home cooking, I’ve also added a section on Food Art which is something I really enjoy. They’re both priced at RM 300 a set for people residing in Malaysia, or SGD 120 a set for those in Singapore.

Free delivery for those in Bangsar and Damansara Heights only.

Please PM me for details!

Special note: 50% of gross profit from the sale of the books will be donated to the National Kidney Foundation as well as the Great Heart Charity Foundation. Should you decide to also donate in addition to buying the book(s), 100% of your donation will go directly to these causes.

Thank you all very much for your love and support!


Advertisement

Korean Chicken Soup

23 Wednesday Sep 2015

Posted by denisegan in Chicken, Healthy, Home Cooking, Korean, One bowl meal, Rice, Soup

≈ Leave a comment

Tags

chicken broth, chicken soup, cleaneating, cleaneats, easy recipes, garlic, healthy, Home Cooking, homecooked, Korean, korean chicken soup, Soup

IMG_6787 IMG_6793I’ve previously mentioned in an earlier post on how to make clear chicken soup. This recipe is similar except that there’s a lot more garlic and scallions in it. It’s a healthy dish and an easy one to make too. All you need is a little time to draw out the chicken essence into the soup.

Ingredients:

  • 1 whole chicken (3 – 4 pounds) – some say that cornish hen works best but as I couldn’t find one, I used an antibiotic free adult chicken
  • 10 – 12 garlic cloves
  • 1 small piece ginger, sliced
  • 1 medium onion, cut into halves
  • 3 scallion stalks – white parts
  • 1/2 teaspoon whole black peppercorns (optional)
  • Codonopsis roots (very much optional!!! I only added this because I had it in hand but the traditional Korean chicken soup does not include any herbs – this excludes the famous Korean Ginseng Chicken soup which has young ginseng and red dates in it)
  • 3 Red dates, pitted (again, very much optional)
  • Extra chicken bones (optional)
  • 10 cups of water
  • 3 scallions – green parts, finely chopped to garnish
    salt and pepper to taste

Cooking Instruction:

  1. The chicken has to be at room temperature before working with it. If you’ve kept it in the fridge, allow it to sit, covered of course, for half an hour at room temperature.
  2. Cut off the wing tips and the tail end. If the chicken came with its head and feet intact, cut those off too. I’m unfortunately squeamish in this area.
  3. Remove any excess skin, otherwise the soup will end up overly loaded with oil
  4. Remove giblets from the chicken cavity.
  5. Wash the chicken under running water and pat dry.
  6. On high fire, prepare a pot of boiling water (pot has to be large enough to fit all the ingredients with room to spare so that the water doesn’t come splashing out as it boils)
  7. Lower the chicken (and extra bones if you have any) into the boiling water and boil for 3-5 minutes before draining the water from the pot. This step helps to ensure further removal of impurities (blood, gunk, etc)
  8. Add the garlic, onion, white parts of the scallions, ginger and peppercorns (and only if you have it, the roots and the dates) to the pot. Lastly add the water. The water level should be at least 2-3 inches above the chicken as it will reduce during the cooking process.
  9. Bring everything to a boil over high heat and then reduce the heat to medium-low to simmer, covered for about 40 -50 minutes. During the cooking, skim off any foam that starts floating about on top. Otherwise you’ll have yourself some really murky looking soup!
  10. Remove the chicken from the broth and place into serving bowl. If you’ve used extra bones, continue simmering for another 30 minutes. If I were just making regular chicken soup, I’d be simmering the lot for 1.5-2 hours. Doing that would compromise the chicken meat but it makes for extremely flavourful soup. As this recipe goes, the chicken should not be overcooked, yet we need the soup to be flavourful. This is where the extra bones come in handy – you can boil those without caring if they become tasteless in the end!
  11. Add salt to the soup to taste.

To serve, you can serve the chicken and the soup in a large decorative soup bowl, garnished with the green scallions.

OR you can ladle some rice into a bowl, top with bite sized chicken bits and pour the soup in, topping everything off with the scallions.

I chose to eat mine with plain rice porridge and some kimchi. Seaweed would have been amazing too!

Whole Roast Chicken and Roast Chicken Thighs

31 Friday Jul 2015

Posted by denisegan in Chicken, Dinner, Home Cooking, Mains, Western

≈ Leave a comment

Tags

baste, butter, celery, chicken, chicken thighs, compound butter, dinner, easy, easy meals, easy preparation, french cut, garlic, mains, onion, oven, oven roast, protein, quick preparation, roast chicken, roast chicken thighs, rosemary, thyme, western, whole, whole roast chicken

Roast chicken dinner for the family! There’s nothing quite like a full roast at the dining table… and no, Nandos and Kenny Rogers do not count. Roasting a whole chicken (or just the thighs as I will show later on in this post) is actually easier than one would think.

Fresh out of the oven and piping hot, it releases a perfumed steam as you cut into the juicy roast. Absolutely divine.
My shopping haul XD. So without further ado, the ingredients:-

Ingredients (for just 1 roast chicken, you can double it if your family is as greedy as mine)

  • 1.7kg whole chicken
  • 25g salted butter, softened
  • 1 tsp chopped fresh rosemary (or whichever herbs you prefer)
  • 1 tsp chopped fresh thmye
  • 3 cloves garlic, minced
  • 1/2 medium white onion
  • 1 stalk of celery of around 10 inches, chopped into large sections (optional)
  • 2-3 sprigs fresh thyme
  • 2-3 sprigs fresh rosemary
  • salt
  • black pepper

Instructions

In a small bowl, combine the butter, chopped thyme, rosemary and garlic to form the compound herb butter.
  To prep the chicken, remove feet, giblets, head, neck and internal organs. Give the chicken a rinse and then pat it dry with some paper towels.
Gently separate the skin from the meat of the breast and spread the herb butter on the meat underneat the skin. If you can get to it, try to spread it onto a part of the thighs as well. Take the remaining butter and rub the skin (do it as gently as possible so the skin does not break. It is very important to keep the skin intact and whole). Rub some salt and black pepper onto the entire surface of the chicken, including the cavity of the chicken. If you’re prepping the chicken the night before, cover the chicken with cling wrap and refrigerate it. Some would condone leaving the chicken uncovered for crispier skin but I just can’t bear the thought of food exposed in the fridge!

Take the chicken out of the fridge an hour before cooking. This makes for tender chicken and even cooking throughout the bird.
  Stuff the cavity with the onion, celery and 1 sprig each of the thyme and rosemary. Here I had stuffed a lemon into the chicken but I’d much prefer the onion and celery option.
Scatter the remaining herbs on top and it’s good to go into the oven!  
Into the oven they go at 205 degrees celsius.   Roast for around 1.5 hours, basting the chicken in its own juices every half an hour.
And there you have it,  a hearty roast chicken that’s ready to be eaten with a variety of side dishes, as can be seen in the picture below!   Roasted some vegetables (recipe to come), made some mushroom soup, lobster pasta, cauliflower cheese (recipe to come) and pomme puree (recipe to come) as well as gravy to go with the chicken.

My sister also made some excellent focaccia bread to go with aged balsamic vinegar. I’m going to nick the recipe off her as well!
  Complete roast chicken dinner.

Roast Chicken Thighs

This is a good alternative when cooking for 1-2 people or if you simply prefer the thigh meat.  Clean the chicken and pat dry. You can use the chicken straight away but I prefer to make it look … somewhat more posh and french.   With reference to the above picture, I cut around the bone near the end of the drumstick. What happens is that I cut through the tendons and sinew (as seen in the top chicken). Remove visible tendons (they’re tough to eat). After which I proceeded to remove all skin, bone and cartilage from the bone end of the chicken, thus resulting the the chicken on the bottom of the picture. All cleaned up at the end.Chicken quarters cleaned up french style.

Make the compound butter (same as that used in the whole roast chicken recipe)

  Smear the compound butter under the skin as evenly as you can.

Tempt the dog (dog doesn’t seem tempted at all).Place the chicken into the oven preheated at 205 degrees celsius (ignore the 190 degrees seen in the picture) for about an hour or until juices run clear and the skin is golden brown in colour. Don’t forget to baste the juices onto the chicken, a couple of times will do I should think.

That’s it! Oh and if you have spare sprigs of herbs, go ahead and arrange them onto the completed dish for decoration.

Quick post: Roasted chicken thighs! 

27 Monday Jul 2015

Posted by denisegan in Chicken, Dinner, Home Cooking, Mains, Sauces, Uncategorized, Western

≈ Leave a comment

Tags

butter, carrots, cast iron pan, chicken gravy, compound butter, cream, gravy, gravy from scratch, mased potatoes, mash, pomme puree, potato rinser, roast, roast chicken, sieve, thyme, young carrots

Been a while since my last post! Coming up: myhumblefood recipes for pomme purée (basically an incredibly light and creamy French version of mashed potatoes), chicken gravy from scratch and the roast chicken. 


Shaoxing Wine Ginger chicken

14 Wednesday Jan 2015

Posted by denisegan in Chicken, Chinese, Dinner, Healthy, Home Cooking

≈ 1 Comment

Tags

chicken, Chinese, easy, easy meals, easy recipe, ginger, ginger wine chicken, healthy, Home Cooking, scallions, sesame oil, shaoxing wine, shaoxing wine ginger chicken, South East Asian, spring onions, white pepper, wine, wine chicken

IMG_6403This dish brings back a lot of memories from my Warwick days. For some reason I remember that the preparation process was long and tedious back then! It involves deboning chicken thighs/drumsticks and skinning and julienning ginger. At the present though, I no longer find it as long and dreary a process. Perhaps I could attribute it to… better knife skills? Or maybe just better knives, I don’t think my knife skills have improved at all since then!

This is a very warming, hearty dish and the sauce is lovely with freshly cooked white rice. It’s currently a favourite with the family and guests who happen to try it! It doesn’t take very long nor need many ingredients and makes a perfect addition to the dining table. I include pictures from two attempts at cooking this dish and I realized that I naturally throw the same ingredients into the pan, despite starting off with perhaps a couple less ingredients in one of the photos. That goes to show that agaration (the South East Asian technique of cooking by guesstimating) isn’t very far off from precision after all!IMG_8442.JPGIngredients from trial number 1IMG_6367Ingredients from trial number 2.

But don’t worry, I’ve consolidated the ingredient list and summarized it as below:-

Ingredients (Serves 4)

  • 2-3 stalks of Spring onions including the white bits with roots removed
  • 3 inches of ginger, peeled and roughly julienned
  • 4 Chicken thighs with skin on, deboned
  • 3 tbsp Shaoxing wine
  • 3 tbsp clear chicken stock/broth
  • 1 tsp kicap manis
  • 1 tsp sugar
  • 1 tbsp sesame oil

Chicken marinade

  • 1 tbsp Shaoxing wine
  • 1 tbsp sesame oil
  • 2-3 tbsp soy sauce
  • white pepper
  • 2 tsp dark soy sauce
  • 2 tsp corn flour

Cooking InstructionsIMG_6372

Upon deboning the chicken, remove the skin from two of the chicken thighs and discard. Keep the skin on for the remaining two chicken thighs. We want some chicken fat rendering in the gravy but not too much!

Trim off the excess fat and remove the tendons from the chicken. Tendons are tough to cut through and unpleasant to eat so be thorough in removing them whenever preparing chicken! Once that is done, cut the chicken meat into bite-sized, uniform pieces so they cook at the same speed. IMG_6373

Place the chicken in a bowl and lightly mix in the chicken marinade with your hands. Let it sit for 10-15 minutes at room temperature.

In preparing the scallions/spring onions, cut them into thirds or 2 inch sections. You can take some of the green sections to slice thinly for garnishing as well.IMG_6368

IMG_6375Heat up some oil in a pan/wok on medium fire. When the oil is hot enough (i.e. if you drop a piece of ginger into the oil it starts to sizzle right away), slide the ginger into the oil gingerly (I’m so funny I know) and fry for a minute until the ginger starts to turn a little golden and the gingery aroma seeps out. The point of this step is to flavour the oil with ginger as well as prep the ginger so it’s at its best to mingle with the chicken.IMG_6380IMG_8448.JPGAdd the chicken pieces and fry until half-cooked. IMG_6382

IMG_6383
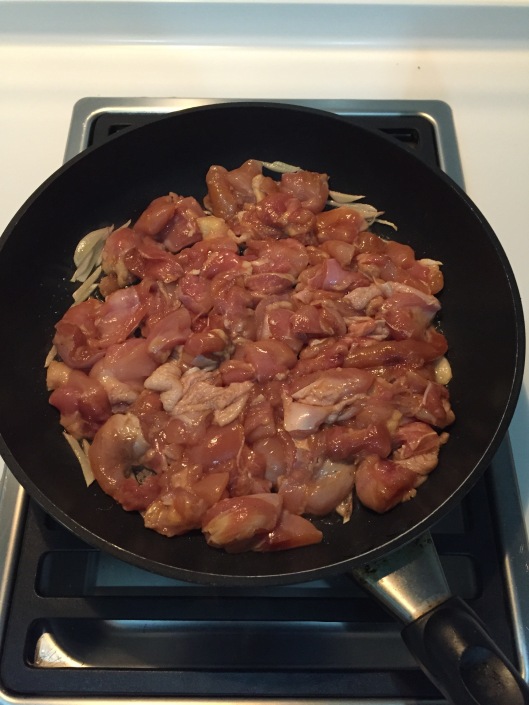
Then, flip the pieces over and add the chicken stock, sesame oil plus Shaoxing wine and cover to cook for a minute. We’re quick-braising/stewing the chicken with some moisture, not searing it to death. Remember, the chicken has to be swimming in a luscious pool of delicious gravy!IMG_6387IMG_6386Upon uncovering, add the spring onion sections into the pan/wok and stir fry for a little while more. Taste to check if it needs more white pepper or salt.IMG_6394

And it’s done!IMG_6400Not the fanciest of dishes but highly satisfying and easy on the stomach. Healthy too!IMG_6407

IMG_6412

Check out the before and after picture of trial number 1. I used 10 thighs for that round of cooking!IMG_8453.JPG

IMG_8456.JPG

Wiped clean. ❤

Nonya fried chicken (inchi kabin)

04 Friday Oct 2013

Posted by denisegan in Chicken, Chinese, Dinner, Home Cooking, South East Asian

≈ Leave a comment

Tags

chicken, chilli powder, coconut milk, curry, fried chicken, ginger, heritage food, inchi kabin, malaysian, nonya food, nonya fried chicken, South East Asian, spices, straits

IMG_655720130925-142956.jpg

Ingredients:

1 small chicken – 1.25kg – 1.5kg, chopped into sections

Marinate:

  • 2 tbsp curry powder
  • 3 tbsp grated ginger (or if u can find it, galangal)
  • 5-6 shallots
  • 2 tbsp chili powder
  • 1 tsp garlic powder
  • 2 tbsp soy sauce
  • 1 tsp coriander powder
  • 1 tsp cumin powder
  • 4 tbsp coconut milk
  • 1 tsp ground black pepper
  • 1 chilli padi (optional – just for the extra kick if you like it spicy)
  • 2-3 stalks lemongrass (optional – I didn’t add this in this time round, but I remember my grandmother putting some in hers.)
  • 1 tsp salt, or to taste
  • 1 tsp sugar, or to taste

20130925-143016.jpg

20130925-143032.jpg

20130925-143047.jpg

20130925-143130.jpg

20130925-143150.jpg

  1.  Trim the excess fat and skin from the chicken pieces and pat dry.
  2. Combined all the marinate ingredients together (blend it if you can, it makes the paste so much smoother. I didn’t ;( )  and add in the chicken. Mix well, really get the marinate into every nook and cranny, then cover with a cling wrap and let the chicken marinate in the fridge for 4 hours or overnight.

20130925-143207.jpg

3.   Remove the chicken from the fridge at least half an hour to an hour before frying.

4.    I tried frying the chicken two ways, one with my brand new air fryer, and the other using the conventional deep frying method.

5.    For the air frying method, I added a little oil to the chicken and mixed it well before placing the pieces into the air fryer. Here’s the result:

IMG_6521

20130925-143226.jpg

20130925-143237.jpg

It’s actually pretty good. Saves me quite a bit of oil and manages to also be healthier.

6.   As for the deep frying method, heat up enough oil to completely submerge the chicken pieces. This should be on high heat.

7.   Gently drop the chicken pieces into the oil, taking care not to overcrowd the pot.

20130925-143259.jpg

8.   Skim off the brown bits from the surface of the oil. This is to prevent being burnt bits floating around the oil and sticking to the chicken.

20130925-143314.jpg

9.   Fry until the chicken turns golden brown (because of the marinade, the chicken will tend to be on the darker side) and starts to float, take care not to overcook the chicken. Remove from the hot oil and place on a kitchen towel to drain off the excess oil

20130925-143329.jpg

20130925-143424.jpg

20130925-143458.jpg

10. Serve. Obviously the deep fried chicken is going to taste better than the air fried ones. However, for the health-conscious, the air fryer is a pretty good alternative.

20130925-143536.jpg

IMG_6532IMG_6545

20130925-143736.jpg

Juicy spiced chicken!

20130925-143758.jpg

Truffle Part 2: Roast chicken with black truffles

09 Saturday Mar 2013

Posted by denisegan in Chicken, Dinner, Lunch, Mains, Western

≈ Leave a comment

Tags

black truffles, easy meals, roast, roast chicken, roast chicken quarters, roast chicken with truffles, thyme, truffle oil, white truffle oil

IMG_0265

Part 2 of the truffle series! An easy recipe, the truffles went amazingly well with roast chicken and the meat was succulent and tender. Got this idea from the wine dinner at St. Regis, but since their method of cooking chicken was beyond me I decided to just make roast chicken. And its pretty easy, just marinade the chicken and dump it into the oven. Half an hour later you get a good dinner, easy peasy.

Ingredients (Serves 4)

Black truffle shavings

4 Chicken quarters (bone in and skin on)

Sprigs of thyme

1 tbsp White truffle oil

Salt and black pepper

Instructions

1. Marinate the chicken thighs well in white truffle oil, thyme salt and pepper for about half an hour at room temperature. Make sure your chicken is at room temperature before roasting it.

2. Preheat the oven to 180 degrees celsius.

IMG_4597

IMG_4598

3. Insert 3-4 black truffle shavings under the skin of each chicken quarter.

IMG_4605IMG_4604

4. Oil the baking tray slightly before placing each chicken piece skin side down on the tray surface. Arrange the thyme springs over the chicken.

5. Roast the chicken skin side down for about 15 minutes.IMG_0253

6. Flip the chicken over and roast for another 15-20 minutes until the skin turns golden brown and crispy.IMG_4609

7. Remove the sprigs of thyme.

8. Arrange on plate and top with fresh sprigs of thyme and black truffle shavings if you wish.IMG_0268

The crispy skin is amazing with the black truffle! IMG_0255

Serve with truffled mash potatoes or roasted vegetables at the side.IMG_0256

Oyakodon

04 Wednesday Jul 2012

Posted by denisegan in Chicken, Eggs, Healthy, Japanese, Mains, Rice

≈ Leave a comment

Tags

chicken, eggs, healthy, japanese, mains, rice

A dish made with chicken, eggs, onions, sake and mirin

A dish made with chicken, eggs, onions, sake and mirin

Oyakodon 2

Oyakodon is a Japanese dish consisting of chicken and onions simmered in a dashi broth with eggs lusciously and carelessly drizzled over the whole mixture. The eggs should be silky smooth and the chicken tender and juicy. It is also called the “Parent and child” donburi (donburi = a sort of Japanese rice dish in a bowl) for obvious reasons; the egg and the chicken.

My brother loves this dish and always orders it at restaurants but it is pretty easy to make once you’ve gotten the hang of it. I tend to mess this recipe up when cooking for many people but it’s easy cooking for one or two people at a time. It’s healthy, no frying or oil in sight, thus no stinking up the kitchen (or my hair =D) while cooking. And it’s got eggs and onions, my favourite combination!

It’s the ultimate Japanese comfort food for me.

Oyakodon ingredients

Cooking for 1-2 pax:

Ingredients

  1. 2 Eggs (3 if you’re cooking for 2)
  2. 1/2 a green onion, sliced
  3. 1 Chicken thigh deboned and cut into bite sized pieces, skin on (1 Chicken thigh per person)
  4. Dashi, I use the bottled one
  5. Sake
  6. Mirin
  7. Light soy sauce
  8. Sugar
  9. Some sliced Japanese leeks for topping

Cooking the Oyakodon

  1. Your rice must be already cooked and warm as you will ladle the chicken and egg mixture directly on top of the rice.
  2. Crack your eggs into a separate bowl. Use a chopstick to break up the egg whites so that they separate easily. Gently break the yolk and give it a stir so its slightly mixed but not incorporated with the whites When you pour in the eggs to cook you want to have some distinct white pieces and yellow bits from the eggs. Don’t scramble the eggs.
  3. Get a small saucepan ready, it shouldn’t be too big as we want the dashi/sake mixture to cover half of the onions and chicken.
  4. Add about 3/4 cup of dashi and 1/4 cup of water to the saucepan. Taste your dashi sauce before cooking. You may want to make fresh dashi from scratch, by all means do but I’m too lazy! This brand of dashi that I’m using already has soy sauce in it so it’s salty.
  5. Add 3 capfuls each of mirin and sake and half a tablespoon of sugar. Taste the mixture and adjust dashi, sugar or water content. Remember it has to be a bit salty as it will form the sauce for your rice. I forgot about that at one time and made the dashi mixture nice on its own but too bland when put together on the rice.
  6. Heat up the dashi on medium high heat and add onions. Again remember that the dashi mixture has to cover up to half of the chicken and onions. Cover until onions are slightly translucent.
  7. Add chicken bits evenly throughout the pan and try to avoid overcrowding. Cover for 1 minute. Uncover and turn the chicken chunks over to cook on the other side. Cover for 1 more minute.
  8. At this point, pour half of the eggs in the bowl over the chicken and onions. Make sure the eggs are evenly distributed throughout the pan. Cover for 10 seconds til partially cooked but still runny. You could cook it further if you prefer your eggs cooked through. Pour the rest of the eggs evenly into the pan. Switch to high heat for 1-2 seconds and turn off the heat, covering entire mixture, and let stand for half a minute.
  9. Ladle your rice into a bowl and spoon the chicken and egg mixture on top carefully so as to keep the shape of the eggs chunky and silky.
  10. Top the whole bowl with shreds or slice of raw Japanese leek which lends a crunchy accent and spicy punch to this sweetish savoury chicken dish.

Recent Posts

  • Myhumblefood is now on YouTube!
  • Kazu Sumiyaki (Cuppage plaza revisited)
  • Free the Robot (Singapore CBD)
  • Fuego, Kuala Lumpur
  • Kita no Ryoba, Sapporo, Hokkaido (Revisited)

Archives

  • June 2020
  • August 2018
  • July 2018
  • May 2018
  • March 2018
  • February 2018
  • December 2017
  • December 2015
  • October 2015
  • September 2015
  • August 2015
  • July 2015
  • January 2015
  • December 2014
  • November 2014
  • October 2014
  • September 2014
  • August 2014
  • July 2014
  • June 2014
  • April 2014
  • March 2014
  • February 2014
  • January 2014
  • December 2013
  • November 2013
  • October 2013
  • September 2013
  • August 2013
  • July 2013
  • June 2013
  • May 2013
  • April 2013
  • March 2013
  • February 2013
  • January 2013
  • December 2012
  • October 2012
  • July 2012
  • February 2012
  • November 2011
  • October 2011
  • September 2011
  • April 2011
  • September 2010
  • June 2010

Categories

  • Alcohol
  • Beef
  • Bento
  • Bread
  • Breakfast and Brunch
  • Cakes
  • Chicken
  • Chinese
  • Condiments
  • Confectionery
  • Cookbook
  • Cookies
  • Desserts
  • Dinner
  • Dips
  • Drinks
  • Eggs
  • Fish
  • Healthy
  • Home Cooking
  • Italian
  • Japan restaurant reviews
  • Japanese
  • Korean
  • Lamb
  • Lunch
  • Mains
  • Nonya
  • Noodles
  • One bowl meal
  • Pasta
  • Pork
  • Restaurant review
  • Rice
  • Salad
  • sandwich
  • Sauces
  • Seafood
  • sides
  • Snack/Light Meals
  • Soup
  • South East Asian
  • Starter
  • Stew
  • Uncategorized
  • Vegetables
  • Western
  • Wine

Meta

  • Register
  • Log in
  • Entries feed
  • Comments feed
  • WordPress.com

Create a free website or blog at WordPress.com.

Privacy & Cookies: This site uses cookies. By continuing to use this website, you agree to their use.
To find out more, including how to control cookies, see here: Cookie Policy
  • Follow Following
    • myhumblefood
    • Join 53 other followers
    • Already have a WordPress.com account? Log in now.
    • myhumblefood
    • Customize
    • Follow Following
    • Sign up
    • Log in
    • Report this content
    • View site in Reader
    • Manage subscriptions
    • Collapse this bar
 

Loading Comments...