After two long years my books are finally done and dusted. I’ve compiled two books, the first Myhumblefood book concentrates on Asian home cooking. The second book is a little more fun; along with some Western home cooking, I’ve also added a section on Food Art which is something I really enjoy. They’re both priced at RM 300 a set for people residing in Malaysia, or SGD 120 a set for those in Singapore.
Free delivery for those in Bangsar and Damansara Heights only.
Please PM me for details!
Special note: 50% of gross profit from the sale of the books will be donated to the National Kidney Foundation as well as the Great Heart Charity Foundation. Should you decide to also donate in addition to buying the book(s), 100% of your donation will go directly to these causes.
Thank you all very much for your love and support!
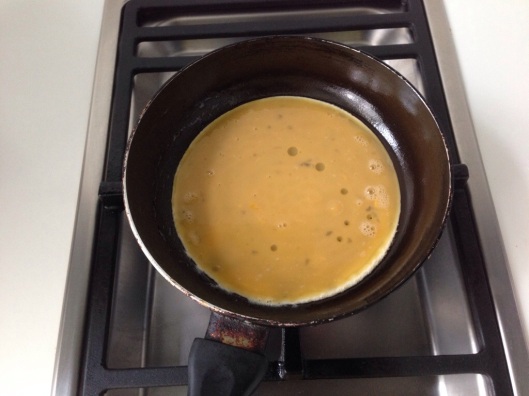
The above picture is from my 2nd attempt at making tamagoyaki. Its a pretty common food in Japanese and Korean cuisine. Perhaps the only difference is that the Koreans don’t make it with sugar, dashi or sake. Of course, the Japanese tamagoyaki has both sweet and savory versions but I prefer the sweet version. While it is helpful to have a rectangular pan for this recipe, it is not necessary. You can make tamagoyaki using a normal frying pan.
For my first attempt, I made tamagoyaki using only 3 eggs and using a low fire. Not only did I have to wait a longer time for the egg to cook, but the egg roll came out kinda small, flat and not as fluffy. It was worse when it got cold and shrank further in size T___T. I poured in only enough egg to cover the surface for the first round but this was a mistake in my opinion.
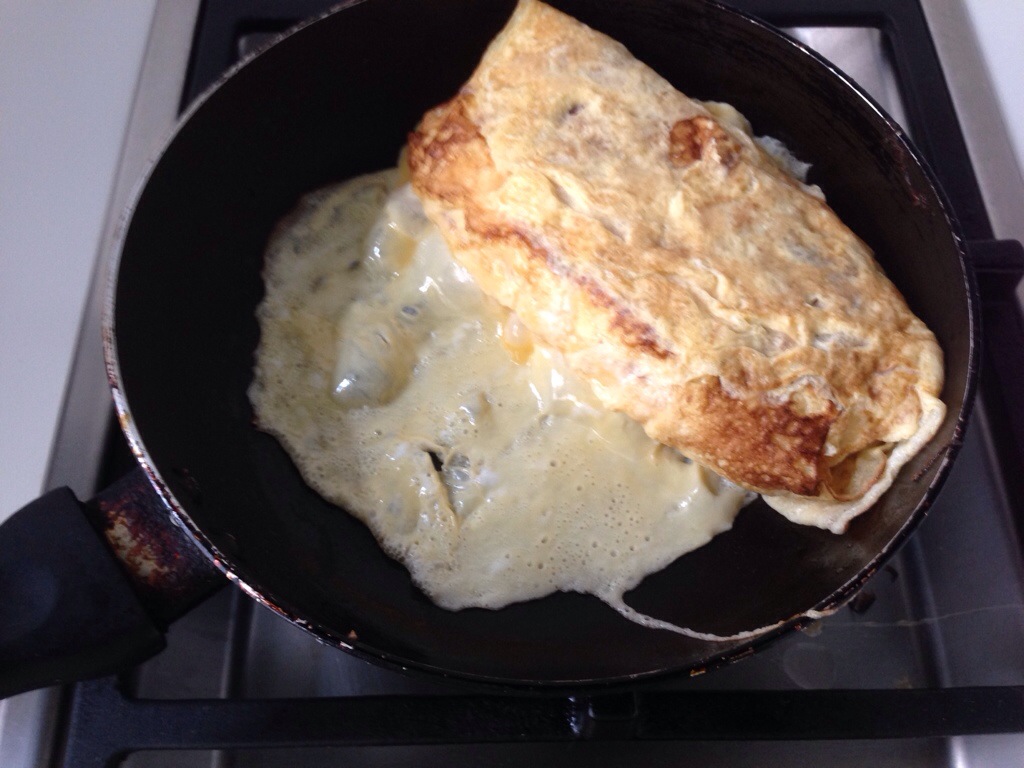
In my 2nd attempt, I used 5 eggs on medium-high heat in a smaller and deeper frying pan. I poured in half the eggs for the first round of cooking and that made the egg roll fluffier. The end result? Thick egg rolls!!! ❤
Other than that generally the cooking methodology is still similar, which is why I’m including my first attempt here as well.
Ingredients
5 eggs
1-1.5 tbsp sugar
5 tbsp water or dashi
1 tsp salt (more or less depending on how salty the dashi is)
1 tsp mirin
1 tsp sake
You will need some kitchen paper for oiling the pan after each round of frying as well.
Instructions
Combine the dashi/water, sugar, mirin, salt and sake into a bowl. Mix thoroughly.
Break the eggs into the bowl with the dashi mixture and beat to just combine but do not overly beat it as we want some egg white bits in the tamagoyaki. Run a chopstick a few times through the mixture to ensure that the eggs are broken up and can be poured easily.
Keep a bowl of oil with kitchen towel next to the pan. You will use this to continuously oil the pan after each round of cooking.
Oil the pan and heat it up on medium-high flame.
Pour in half the eggs.
Scramble it a little. Fold over when the bottom is set enough to flip it over. Oil the exposed side of the pan, and then gently push the “omelette” to the side of the pan. Oil the rest of the pan before adding more egg. This time add just enough egg to cover the pan.
Above, I’ve already pushed the first layer of egg to the side and added the 2nd thinner layer. Lift the first “Omelette” so that the second layer of egg goes underneath to coat the entire pan. See those bubbles forming? Pop them!
Hehehe! Once this layer is more or less set, flip the thicker part onto the thin layer. This would create the “roll” layer. Again, oil the exposed part of the pan, push the egg to that side and oil the rest of the pan. Then add another layer of egg. Continue the process until all the egg is used up.
The last bit of egg… and you’re done! Brown the outsides if you like but don’t overdo it. If you want to shape the tamagoyaki into something more rectangular/oval you can make use of a sushi mat, but you have to shape it when it’s still hot.
Lastly, slice the tamagoyaki and serve 😉
I did not shape the tamagoyaki so the shape of it has a mind of its own T___T
I’m also going to add pictures from my first attempt. You can see that the heat is lower and the pan is bigger. So I “rolled” the egg several times and pushed the egg to the middle instead of the very end.
Waiting for the egg to cook before flipping the roll towards the left.
Above, after pushing the roll to the middle, I added another layer of egg.
Continue the process…
Finally done.
Now to cut it!
As you can see, the roll isn’t very thick. Also, it shrank after it cooled and wasn’t as fluffy. Which is why I prefer the first method of cooking on medium high heat and in a smaller pan. Cooking half the eggs and scrambling them in the first round saves time and also makes the eggs fluffy. So try it yourself and see which way works well for you.
I’ll leave you with some youtube links on making tamagoyaki :-
This is another quick uni and white truffle combination that I love. Super easy to put together because you’re gonna be using ready-made garlic bread!
Just grab your favourite brand of garlic bread, pop it into the oven until its nice and hot and crispy on the outside and then top it off with a heaping mountain of golden orange sea urchin roe (make sure it is fresh uni). Finish it off with a sprinkling of chopped chives and fragrant slivers of white truffle. The garlic bread should have enough salt content, but you can add some fleur de sel on top if you wish.
Love ❤
And then there’s salad. I put together a salad of baby spinach leaves, radish, cherry tomatoes, a handful of dried blueberries, some ikura/salmon roe (personally I love ikura but you can leave this out if you think it’s weird), shaved parmigiano reggiano cheese and white truffle on the top. Dressed it lightly with my favourite dressing; a simple honey, lemon and mayo mixture. I can’t remember now if I added any truffle oil to this or not. Good time to try making this again when I get hold of some truffles!
Almost finished with the truffle series! Here I made two simple dishes with the truffles, a puff pastry and a salad. Really easy and yummy stuff.
Puff Pastry Ingredients (for 1 pax)
A quarter of ready made puff pastry (I used Jus-rol, the 500g packet)
Grate a good handful of your favourite cheese (I used cheddar)
Sliced mushrooms (about 3 fresh swiss brown mushrooms)
1 teaspoon of truffle oil
1 egg
1 egg white to glaze
Black pepper and salt
Salad Ingredients (for 1-2 pax depending on how greedy)
7-8 almonds sliced (If you can buy them pre sliced, that’s even better
Handful of cranberries
Juice and rind from half a yellow lemon (omit the rind if you don’t like it)
3 tbsp mayo
1-2 tbsp honey
Enough salad leaves for 1-2 pax
Instructions
Roll out the ready made pastry into a square and trim off the sides so that it’s nice and neat.
Preheat the oven to 220°C (200°C for fan assisted ovens). You should follow the instructions printed on the wrapping, oven temperatures and timings may differ.
Cut a little more of the ready made pastry and roll it out to make 4 strips, you will need to place each strip at the edge of the pastry square so it holds the ingredients (and egg) in.
Arrange the cheese and mushrooms in the pastry, leaving space in the middle. The egg will be added here later on. In the meantime, brush the pastry with the egg white for that golden brown colour
Bake the pastry for about 12 minutes (this would depend on the total time you need to bake the pastry. If you need to bake it for 20 minutes, add the egg 3-4 minutes before completion). If I remember correctly I baked it for 15 minutes, so I slid the egg into the middle after 12 minutes. You can add more cheese around the egg after that if you wish. Then drizzle the truffle oil over the pastry.
Once the pastry is golden brown and the egg is cooked, remove from oven.
While the pastry is cooking, wash and drain the salad leaves, slice the almonds and fry them til golden in color. Pat the excess oil off almonds with a kitchen towel and set aside.
Mix the lemon juice and rind, mayo and honey together in a separate bowl.
Place salad leaves in a salad bowl and toss with the honey lemon and mayo mixture. Add cranberries, sliced almonds and shave some of that black truffle on top. Serve.
Season pastry with black pepper (and, if you chose a mild, not-so-salty cheese, some salt) and add some truffle shavings. Eat!
You can add other things to your salad, I added cherry tomatoes to mine.
If you like your egg less cooked then just cook it for 1.5-2 minutes before removing from the oven. For me, as long as the whites are cooked I’m all good.
I saw this in one of Nigella Lawson’s cookbooks and had to make it! I love green salads with eggs. Caesar salads for one =p. The recipe in Nigella’s book calls for mustard, vinegar and worcestershire sauce for the dressing but I used honey, mayonnaise and Dijon mustard. It was as I liked it 😉 sweetish sour with a slight kick from the mustard.
Ingredients (Serves 4 as a starter, or Serves 2 as a full meal)
4 eggs
1 head escarole or frisee (I used Romaine lettuce, you can use other leaves of your preference)
1 teaspoon garlic oil
200g smoked lardons or smoked streaky bacon cut into chunks (I just cut up some sliced bacon)
small bunch of flat-leaf parsley, chopped
For the dressing: 1 tsp Dijon mustard, 4 tsp cider vinegar, a dash of Worcestershire sauce
Parmesan cheese (Optional)
1 Chicken fillet (Optional)
Instructions
Put the eggs into a saucepan of water, bring to the boil, let boil for 1 minute, then turn off the heat and let the eggs sit in the pan for 10 minutes (the egg would come out still golden in the centre and not hard boiled all the way, and the whites would be silkier).
Wash, drain and tear the salad leaves into bite sized pieces and place it into a bowl.
Heat the garlic oil in a frying pan and fry the lardons/bacon until crisp.
Drain the water from the egg pan and run cold water on the eggs. Once they are cool to the touch, peel them.
Transfer the lardons/bacon with a slotted spatula onto some sheets of kitchen roll.
Add Dijon mustard to the juices in the bacon pan and whisk to mix, then add the vinegar and a dash of Worcestershire sauce, whisk again and pour this over the salad leaves, tossing to mix. (Here, I just mixed honey, Dijon mustard and mayonnaise together until I liked the taste. No extra bacon oil here)
Now add the bacon to the salad and toss again. Then quarter the eggs and add them along with the chopped parsley, before giving the whole salad a gentle mix to combine.
If you’re adding chicken, brush the chicken with olive oil, then sprinkle salt, pepper other herbs of your choice. Place in a baking tray and bake at 190 degrees celsius and roast for 15-25 minutes depending on the breast size until the juices run clear. Remove from oven, let it rest for 15 mins before slicing/shredding to add into the salad
Result… a very filling and satisfying salad! Omit bacon and cheese to make it healthier 😉
I was cracking my head on what else I should do with the remainder of my truffles. I had way too much for myself! Then my sister described a dish that she really enjoyed at Zafferano. I’ve never been to Zafferano myself, but what she described sounded just perfect as it was not heavy and full of cream and fat (well, excluding the foie gras that is). I had been pigging out on heavy, calorie-laden food while making all these truffle dishes. Clear broth sounded amazing then.
Ingredients (per person)
1) Half a foie gras slice, cut into chunks (well you can add more if you like, but remember this is going to be boiled and not seared, thus it would make the soup really oily if you add too much)
2) chicken broth to fill up to slightly more than half of the soup bowl that you will be using
3) 1/4 of a courgette,sliced and quartered
4) 1/4 of a large carrot, sliced
5) 1/4 a large onion, sliced or 3 inches of a white radish, sliced and quartered
6) Truffle shavings
7) 1/4 of a 500g Jus-Rol Frozen Puff Pastry sheet, rolled out in a square shape and trim the ends with a sharp knife. It should be large enough to cover the soup bowl
Instructions
1) Add the vegetables and foie gras to the broth and simmer for about 5 minutes or until vegetables are sufficiently cooked to your liking.
2) Meanwhile preheat your oven temp. to 220ºC or the temperature that is stated on the cooking instructions for your ready made pastry.
3) Ladle out your soup into the bowl, I think it would be best if the soup was warm and not boiling hot because if it is the latter, the steam from the soup will cause the pastry puff sheet to sink down a lot more while baking. Mine totally sunk =(. Lastly add some sliced truffle into the soup. You could add the ends of the truffle, which is difficult to shave but too much of a waste to let go.
4) Place the pastry sheet over the soup bowl and make sure it is securely in place. Using a fork to make patterns (see picture below) helps to secure it in place. You can also go crazy with the patterns. 😉
5) Bake for 15-20 minutes until the puff pastry is all nicely puffed up and golden brown.
6) Told you my dough sank into the soup =(. With the middle bit sunken like that I had to save it somehow, so I draped a couple of sprigs of thyme and shaved the truffles on top
7) It was really good! The pastry and soup together is so comforting ~ Would totally make this again.
I love mushroom soup. Even though I’ve been eating canned Campbell mushroom soup for most of my life, nothing beats freshly made cream of mushroom soup. I attempted it for the first time as part of my truffle menu and used portobello and those nice swiss brown mushrooms. Other recipes call for er… wilder varieties of mushroom but since its just me and my helper, I decided to just use mushrooms that I’m used to. The end result should be a creamy thick soup of mushrooms and enhanced just by some chopped parsley, truffle shavings and perhaps a drop or two of truffle oil.
Ingredients (Serves 4)
100g butter
500g mushrooms (I used 250g portobello and 250g swiss brown mushrooms)
350ml chicken stock
400ml water
100g cooking cream
4 cloves of garlic, minced
1 tbsp of creme fraiche per bowl of soup (you can adjust this if you like)
Fresh truffle shavings
1 tsp chopped English parsley per bowl
Salt and black pepper for seasoning
Instructions
1. Wash the mushrooms thoroughly and drain.
2. Slice the mushrooms to the same thickness (otherwise you’ll get inconsistencies in texture after blending)
3. Melt the butter in a sauce pan large enough to hold 2 litres of water. I used a wok as I’m more comfortable with it.
4. Fry the garlic and mushrooms together for 5 minutes. The mushrooms will release some liquid.
5. Add chicken stock and water and bring to the boil before turning down the heat. Cover with the lid and let it stew for about 30 minutes.
6. Add the cream and let it simmer for another 3-5 minutes. Season with salt and pepper.
7. Blitz the soup with a hand blender. Be careful when you do this as you don’t want the hot liquid to fly all over the kitchen and onto you!
I transferred the mixture into a mixing jug for blitzing.
8. Blitz until your desired consistency. I like mine slightly chunky
9. Ladle into soup bowl and top with creme fraiche, truffle shavings, parsley and a little white truffle oil if you like.
I’ve previously tried a foie gras pate and fried onions combinations. I just thought I’d try something one step further and use foie gras lobes and top everything with my beautiful winter black truffles ❤
Ingredients (Serves 2 pax)
4 slices of french baguette bread
2 lobes of foie gras at room temperature
1/2 a large onion
Black winter truffle shavings
Fleur de sel and black pepper
Instructions
1. Heat some oil in a frying pan on medium heat. Once the oil is hot, add the onions. Fry until golden brown and caramelized.
2. This is where I made a mistake, I used the same pan to fry the foie gras and didn’t wash it. The pan should have been dry and hot as foie gras is already oily as it is. But as I reused the pan there was some residual oil and bits of fried onion T_____T. Not that it makes much difference to the taste, it just looked bad afterwards.
3. Sear the foie gras for about 45 seconds on each side.
4. Remove from the pan and slice thickly (see above).
5. Lightly toast the baguette slices
6. Assemble your crostini! Place some of the caramelized onions on the toasted baguette, arrange the foie gras slices on it and season with fleur de sel and black pepper. For the finishing touch, just go crazy shaving the truffles all over the plate!
Its a little hard eating the crostini as bits of onion tend to fall off but its totally worth it. The fatty rich foie gras with the sweet onions and delicate aromatic truffles truly make a heavenly bite!
So I decided to indulge in my newfound love for truffles. I ordered two black winter truffles and it arrived today! Super excited. Its now stored in rice in my fridge, and accordingly I placed eggs in the same container just to maximize the use of the truffles. My fridge smells like truffles now mmmm.
This is a dish I had at Aoki, a japanese restaurant in Singapore, and its pretty easy to replicate. It is also foolproof and perfect as a starter. The chopped canned truffle adds a little bite to the dish and the fleur de sel not only makes the dish look aesthetically pleasing, it also gives a briny crunch to the fish that, on many levels, is so different from your ordinary table salt.
Will be putting up several truffle-themed posts, this is just the first 😉
They’re pretty big aren’t they?
Ingredients
1 tbsp Truffle oil
Tai (sea bream) sashimi grade sliced thinly
Fleur de sel
1 summer black truffle from a jar
Generous shavings from a fresh black winter truffle
Instructions
1) Chop up your summer truffle into little chunks. Don’t mince it too finely as we want some texture to this dish.
2) Arrange the fish on the plate
3) Sprinkle the chopped truffle on top of the fish and drizzle the truffle oil.
4) Add shavings of black winter truffle on top and season with fleur de sel.